Making your own Email Subscription Service with Node.JS
📣 Sponsor
It's common for websites to have a subscription button, where you can pass along your email address, and you'll receive emails every week, month or day. Sometimes, these are automated emails, and sometimes they are custom posts written by an editor.
It's also common to pay for this service, sometimes extortionately. In this article I'll show you it's pretty easy to create your own, although you will obviously still have to pay for hosting. Let's look at how to create an email subscription service with MongoDB and Node.JS.
You can find the source code for this article here.
Flow of Data for Email Subscription
Emails subscriptions are not architecturally hard to understand. You start with a form where users can submit their email. Then every so often we'll run a job which will send that email to users, at a particular time and day.
For this guide, we'll be using Node.JS and MongoDB. The flow of data looks something like this:
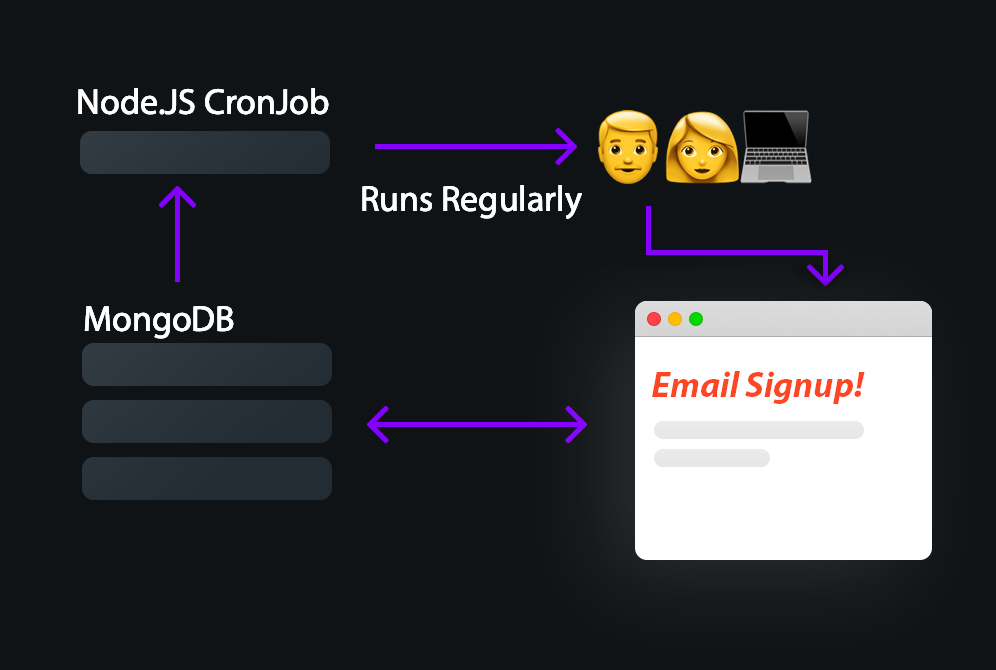
For this to all tie together, we'll have to make two endpoints on a Node.JS server - one for unsubscribing and one for subscribing. Our file structure for this project looks like this:
daemons                      <-- For storing any regular jobs
| - subscription.daemon.js   <-- Our subscription service, which runs automatically once a week
models                       <-- For storing database models
| - subscription.model.js    <-- How our subscription service will look in the MongoDB database
public                       <-- All our public files
| - index.html               <-- Landing page
| - local.js                 <-- local frontend Javascript
templates
| - mail.html                <-- the mail we will send to our users
.env                         <-- configuration
.gitignore
index.js                     <-- where we will store our subscribe and unsubscribe routes
util.js                      <-- some utility functions
package.json
package.lock.json
Step 1: Setup your Frontend
The first step is to make your frontend form. You might be using a framework for this, like Vue or React, but for simplicity I've created one in plain HTML. Here is our simple subscription form, which I've put in ./public/index.html:
<div id="subscribe-box">
    <h2>Subscribe for Daily Dev Tips</h2>
    <p>Subscribe to our weekly newsletter, to stay up to date with our latest web development and software engineering posts via email. You can opt out at any time.</p>
    <div class="error-message">
        Not a valid email
    </div>
    <div class="form-holder">
        <input type="text" value="" placeholder="dev@email.com...">
        <input type="submit" value="Subscribe">
    </div>
</div>
<script src="local.js"></script>
As we discussed before, we'll ultimately be making two server endpoints - one to save user's email details to a database, and another to allow them to unsubscribe (thus removing them from the database). As such there is a bit of frontend Javascript to go along with this, which I'm storing in local.js. Our Javascript accomplishes a few things, which you can read about in the inline comments:
- If a user clicks or presses enter, then we submit their email to let them subscribe.
- If a user enters an invalid email, we'll show them an error.
- When we get the response back from the server, we'll display that to the user.
- We'll use
fetch()to send our API requests.
local.js:
if(document.getElementById('subscribe-box') !== null) {
    // If the subscribe box is on this page..
    if(document.getElementById('subscribe-box') !== null) {
        // For validating an email
        const validateEmail = function(email) {
            const regex = /^(([^<>()[\]\\.,;:\s@"]+(\.[^<>()[\]\\.,;:\s@"]+)*)|(".+"))@((\[[0-9]{1,3}\.[0-9]{1,3}\.[0-9]{1,3}\.[0-9]{1,3}\])|(([a-zA-Z\-0-9]+\.)+[a-zA-Z]{2,}))$/
            return regex.test(email);
        }
        // For verifying a subscription
        const subscribe = async function() {
            // Get the value of the input
            let input = document.querySelector('#subscribe-box input[type="text"]').value;
            // Validate if it's an email
            if(!validateEmail(input)) {
                // Show an error if it's not
                document.querySelector('#subscribe-box .error-message').classList.add('active');
                setTimeout(function() {
                    document.querySelector('#subscribe-box .error-message').classList.remove('active');
                }, 3000);
            } else {
                // Otherwise post to our subscribe endpoint
                let postEmailSubscription = await fetch('/subscribe/email', {
                    method: 'POST',
                    body: JSON.stringify({
                        "email" : input
                    }),
                    headers: {
                        'content-type': 'application/json'
                    }
                });

                // Get the response
                let getResponse = await postEmailSubscription.json();
                document.querySelector('#subscribe-box .error-message').textContent = getResponse.message;
                document.querySelector('#subscribe-box .error-message').classList.add('active');

                // Show the apropriate response
                if(getResponse.code == "03") {
                    localStorage.setItem('#subscribe', input);
                } else {
                    setTimeout(function() {
                        document.querySelector('#subscribe-box .error-message').classList.remove('active');
                    }, 3000);
                }
            }
        };

        // If the user clicks subscribe submit their subscription
        document.querySelector('#subscribe-box input[type="submit"]').addEventListener('click', function(e) {
            subscribe();
        });

        // If the user presses enter submit their subscription
        document.querySelector('#subscribe-box input[type="text"]').addEventListener('keydown', function(e) {
            if(e.keyCode === 13) {
                subscribe();
            }
        });

    }
}
Step 2: Setup Backend
First things first, make sure you have MongoDB installed. Now we'll create our two routes - for subscribing, and for unsubscribing. It's worth noting, I've set up a a barebones subscription model which defines how the subscriptions will look in our database. It can be found in ./models/subscription.model.js:
import dotenv from 'dotenv'
dotenv.config();

import mongoose from 'mongoose'

mongoose.createConnection(process.env.mongooseUri, {
    useNewUrlParser: true,
    useUnifiedTopology: true,
});

const schema = new mongoose.Schema({
    email: 'string'
});

const Subscription = mongoose.model('Subscription', schema);

export { Subscription };
index.js
Next up, let's make our routes. We'll be putting them in ./index.js. We aren't doing anything too complicated here - we are initiating an express server, and adding two routes to it, one which saves data to the database, and another which deletes it. I'm using a validateEmail function which can be found in ./util.js to validate any incoming emails.
I'll leave it to you to integrate this into your already existing server if you need to, but the full code for index.js is shown below:
// NPM
import dotenv from 'dotenv'
dotenv.config();// NPM
import dotenv from 'dotenv'
dotenv.config();
import express from 'express'
import bodyParser from 'body-parser'
import mongoose from 'mongoose'

// Model
import * as Subscription from './models/subscription.model.js';

// Utils
import { validateEmail } from './util.js';

mongoose.connect(process.env.mongooseUri, {
    useNewUrlParser: true,
    useUnifiedTopology: true,
});

// App Settings
let app = express();
let port = 3000;
let jsonParser = bodyParser.json();

// Set up our public folder
app.use(express.static('public'))

// A user wishes to subscribe
app.post('/subscribe/email', jsonParser, async function(req, res) {
    try {
        // Check if the email exists first of all
        let checkSubscription = await Subscription.Subscription.find({ 'email' : req.body.email });

        // If it doesn't..
        if(checkSubscription.length === 0) {
            // Then validate the email
            if(validateEmail(req.body.email)) {
                // And add it to the database
                const newSubscription = new Subscription.Subscription({
                    email: req.body.email,
                });
                newSubscription.save(function(err) {
                    if(err) {
                        res.status(400).send({ "message" : "Error saving your email.", "code" : "02" });
                    } else {
                        res.status(200).send({ "message" : "User has subscribed.", "code" : "03"  });
                    }
                })
            } else {
                // Otherwise show errors
                res.status(400).send({ "message" : "Error saving your email.", "code" : "02" });
            }
        } else {
            res.status(201).send({ "message" : "User Already Subscribed.", "code" : "02"  });
        }
    } catch(e) {
        // Or a real error if something really goes wrong
        console.log(e);
    }
});

app.get('/unsubscribe/:email', async (req, res) => {
    // Unsubscribe email
    if(typeof req.params.email !== "undefined") {
        // When we unsubscribe, check for an email
        let findEmail = await Subscription.Subscription.find({ "email" : req.params.email });

        if(findEmail.length > 0) {
            // If it exists, remove it
            await Subscription.Subscription.deleteOne({ "email" : req.params.email });
            res.send({ "message" : "Email deleted.", "code" : "00" });
        }
        else {
            // Otherwise the user wasn't even subscribed to begin with
            res.send({ "message" : "Email doesn't exist.", "code" : "01"})
        }
    }
});

app.listen(port);
At this point, we have a functioning database/frontend connection. Users can submit or delete subscriptions via the frontend, and we'll store it all in one MongoDB backend database.
Configure your .env file
The last thing to do for this step is to configure your .env file to include some basic settings:
#mongodb details
mongooseUri=LINK_TO_YOUR_MONGODB_URI

# email connection details
contactEmail=EMAIL_ACCOUNT
contactPassword=PASSWORD_FOR_EMAIL
contactHost=SMTP_HOST.com
Since we'll be using nodemailer, you need an SMTP account. You can read more about why you need an SMTP account here. Fortunately there are a few ways to set this up, and if you have Plesk, it's pretty easy to make new webmail accounts.
Regardless, you will need a username and password to login to your SMTP webmail account, wherever it is hosted. As such, make sure it's in your .env file as shown above!
Step 3: Setup a CronJob
The final step in our code is to start sending emails to people. This job will be in ./daemons/subscription.daemon.js. Let's look at some of the main things going on in this file to start with.
How CronJobs work
CronJobs are processes which run at specific times and days. To set it up in Node.JS, we use node-scheduler, but the basic syntax of a CronJob remains the same in most scheduler systems. A CronJob schedule as the following pattern:
*    *    *    *    *    *
┬    ┬    ┬    ┬    ┬    ┬
│    │    │    │    │    │
│    │    │    │    │    └ day of week (0 - 7) (0 or 7 is Sun)
│    │    │    │    └───── month (1 - 12)
│    │    │    └────────── day of month (1 - 31)
│    │    └─────────────── hour (0 - 23)
│    └──────────────────── minute (0 - 59)
└───────────────────────── second (0 - 59, OPTIONAL)
Since I wanted my emails to send every Monday at 10:30am, the CronJob schedule looks like this:
schedule.scheduleJob('00 30 10 * * 1', function() {});
How Nodemailer works
We'll also be using nodemailer, which is what sends the mail. Using our email and password from our .env file, we configure a transporter. From that transporter, we can start to send mail to users:
const mailer = async function(title, obj) {
    try {
        let email = await fs.readFile('./templates/mail.html', { encoding:'utf-8' } );
        let text = replaceHTML(email, obj);
        let transporter = mail.createTransport({
            host: process.env.contactHost,
            port: 465,
            maxMessages: Infinity,
            debug: true,
            secure: true,
            auth:{
                user: process.env.contactEmail,
                pass: process.env.contactPassword
            },
            tls: {
                rejectUnauthorized: false
            }
        });

        let allSubs = await Subscription.Subscription.find();

        allSubs.forEach(function(item) {
            if(typeof item.email !== "undefined") {
                transporter.sendMail({
                    from   : `${process.env.contactEmail} <${process.env.contactEmail}>`,
                    to     : item.email,
                    subject: title,
                    replyTo: process.env.contactEmail,
                    headers: { 'Mime-Version' : '1.0', 'X-Priority' : '3', 'Content-type' : 'text/html; charset=iso-8859-1' },
                    html   : text
                }, (err, info) => {
                    if(err !== null) {
                        console.log(err);
                    }
                    else {
                        console.log(`Email sent to ${item.email} at ${new Date().toISOString()}`);
                    }
                });
            }
        });

    } catch(e) {
        console.log(e);
    }
}

// Run the CronJob
schedule.scheduleJob('*/10 * * * * *', async function() {
    try {
        mailer(`This is our Subscription Email`, {
            'content' : "Hello, welcome to our email 👋"
        });
    } catch(e) {
        console.log(e);
    }
});
As you start to scale to larger and larger amounts of messages, you may wish to alter the transport used here. You can also alter the maxConnections property of your transport to increase the number of connections available to send messages from, as you scale.
Ideally, you will run this on a dedicated mail server - but it's not always possible to do that. This will work really well for 1000s of messages, but if you scale beyond that, other solutions may be required.
Step 5: Make sure your email is configured right
Since you'll be sending emails to users, you have to make sure your mail is configured right. If you're running into trouble, try the following:
- Make sure port 465 and 587 are open on your mail server. Your host or cloud provider should have documentation on how to do this.
- Ensure you DNS is configured properly. That means having an
MXCNAME setup. For me, this looks likeMX @ mail.fjolt.com. - Make sure you have secured your mail. It's easy for mail providers to mark an email as spam. Make sure you have DKIM, DMARC, and SPF setup on your DNS so that gmail and others knows your mail is legitimate.
- Check the logs. If you have issues sending mail, check to see the mail is successfully being sent. If it's not, you might have a server configuration problem. If it is, your mail may be marked as spam.
- Run the daemon with test emails. Use a service like mail-tester or your own personal email to see if you are receiving messages. You can change the CronJob to
*/10 * * * * *to run it every 10 seconds for testing purposes.
Finally, make sure you update the email to be sent. You can find the default email that will be sent in the ./templates/mail.html file.
Running your services
We now have two services. One is for our database - subscribe and unsubscribe, to add and remove emails. The other is our mailer daemon, which will run every Monday at 10:30am.
To run both, we can use pm2, which is easily installed by using npm i -g pm2 on the command line. This will ensure both of our services run successfully for as long as we want them to:
pm2 index.js
pm2 ./daemons/subscription.daemon.js
Conclusion
If everything is configured right, and you have a valid SMTP account, your mail server should now work and you'll be able to send messages out to everyone in your database. You can also extend this to get the email itself from the database, allowing you to craft custom mails which are sent out every Monday.
This solution is relatively scalable, and works fine for most use cases. For larger ones, where millions of messages are involved, you may have to look into scaling.
I hope you've enjoyed this article. Here are some useful links:
- The source code is available on GitHub.
- Nodemailer documentation on setting up an SMTP account.
- An introduction to DKIM, DMARC and SPF.
More Tips and Tricks for Javascript
- Removing the last element of an array in Javascript
- How does Optional Chaining work in Javascript?
- Javascript Operators and Expressions
- Javascript Comments
- Checking if a value is a number in Javascript with isNaN()
- How to Make Payments with the Javascript Payments API
- How to remove a specific item from an array
- Making a Morphing 3D Sphere in Javascript with Three.js
- Javascript Temporal and How it Works
- How to get the Full URL in Express on Node.js