CSS Layers Tutorial: Real CSS Encapsulation
📣 Sponsor
CSS layers are a way for us to segregate and separate out our CSS into logical pieces. With CSS layers, we can fully encapsulate our CSS for import. That means modules, scripts, or anything else imported into your projects can have CSS that is entirely separate from your own, putting to bed the age old problem of styles overriding each other. It will also let us be more agile with the CSS we add to our pages with custom import statements.
Let's look at how CSS layers work, browser support for CSS layers, and how you can use them.
Support
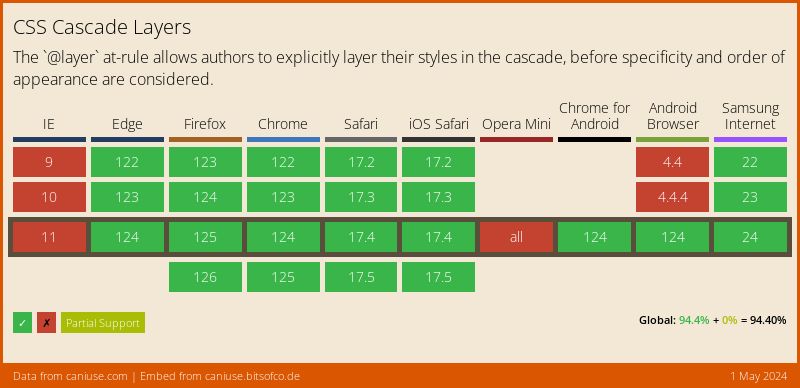
CSS layers are currently supported in the latest versions of Firefox and Chrome, with Safari soon to support it in its next release.
Full, up to date support can be viewed below:
How CSS Layers Work
You may be familiar with the concept that an id # selector overrides a class . selector. Layers are weaker than unlayered CSS - so a layer at the bottom of your document will still be overridden by a style outside a layer elsewhere. As such, in the below example, the div element has display set to block, even though the div in the layer has a higher specificity:
div {
    display: block;
}

@layer myLayer {
    div#id {
        display: flex;
    }
}
When using CSS Layers, they follow the same principle syntax as other block statements in CSS. As such, we can define a new layer like this:
@layer myLayer {

}
Everything within the curly brackets will relate to "myLayer". As you can imagine, we can put any kind of CSS within a layer. So I could do something like this:
@layer myLayer {
    p {
        color: red;
    }
    @media screen and (min-width: 100px) {
        a { color: blue; }
    }
}
... and of course we can define multiple layers one after another, as so. You may also define anonymous layers, which have no names. Note that in the next example, #id.class will render blue, since myOtherLayer comes last, despite myLayer having a higher specificity.
@layer myLayer {
    div #id.class {
        color: red;
    }
}
@layer myOtherLayer {
    #id.class {
        color: blue;
    }
}
@layer oneMoreLayer {}
@layer {}
And to add another layer of complexity (pun intended), layers can be put into layers, and layers with the same name within the same layer or at the top level of your CSS document automatically merge:
@layer myLayer {
    @layer mySubLayer {

    }
}

@layer myLayer {
    /* this is the same as the previous "myLayer" - CSS automatically considers them one layer */
}
Ordering CSS Layers up front
As well as the benefits of being able to fully encapsulate your code with layers, you can tell the browser straight away in which order layers should go in. As with all things CSS, what comes last has the highest importance. So the below example gives highest importance to styles in myLayer, meaning the selected HTML element will render red.
/* oneMoreLayer will be overridden by myOtherLayer, and then overridden by myLayer */
@layer oneMoreLayer, myOtherLayer, myLayer;
@layer myLayer {
    div #id.class {
        color: red;
    }
}
@layer myOtherLayer {
    #id.class {
        color: blue;
    }
}
@layer oneMoreLayer {}
This makes CSS ultimately so much more powerful - imagine importing a CSS library which no longer has to worry about other CSS you have in your code. It can easily insert itself to the end of your document as a single layer, which acts by itself!
CSS Layer Cascading Precedence Order
CSS layers uses !important a little differently than what we're normally used to. In CSS layers, a layer with lower priority with an !important style, will be more important than a layer with a higher priority. Ultimately, this is so lower down layers can show a specific style is essential for their design, allowing us to enforce certain styles with certain layers.
As such, a styles override each other in the order below, where items at the top of the list are the most important:
- layer at top of page,
!importantstyle - layer at bottom of page,
!importantstyle - unlayered style with
!important - unlayered style
- layer at bottom of page
- layer at top of page
So as we mentioned before, a layer further down the page will override the styles of a layer higher up the page, and an unlayered style will override a layer. The only confusing piece is that a layered style that is at the top of the page with an !important style, will override an !important style in a layer at the bottom of the page. This is a little confusing at first, but ultimately means we have to be a little more careful when using !important in CSS layers.
An example of !important in CSS Layers
@layer myLayer {
    div {
        color: red !important;
        background: green;
    }
}
@layer anotherLayer {
    div {
        color: blue !important;
        background: blue;
    }
}
In this example, we have two layers. Both use !important for their colors. Since layers with !important at the top of the page have higher precedence, the div has a color of red. However, since layers without !important have a higher precedence at the bottom of the page, the div has a background of blue. Ultimately, then, our div has these styles:
div {
    color: red;
    background: blue;
}
How to import a CSS file into a new layer
CSS layers also allow us to import entire stylesheets into a new layer. The below code imports dropdown-styles.css into the layer midnightDropdownLayer.
@import url('dropdown-styles.css') layer(midnightDropdownLayer);
Conclusion
CSS Layers are going to change how we write code, and give us new features which will make encapsulation of projects really easy. Ultimately, new features like layers will fuel a whole new set of post processing and front end web technology which will change how we build websites today.
If you're interested in learning a bit more, I've added some links below:
More Tips and Tricks for CSS
- How to vertically center text and HTML elements with CSS
- Smooth CSS Gradient Transitions
- A first look at CSS When and Else Statements
- The Interactive Guide to CSS Grid
- CSS Transformations
- CSS Units
- Automating CSS Dark Mode
- CSS Animations
- iOS Crystalline Blurred Backgrounds with CSS Backdrop Filters
- Using Only CSS to Recreate Windows 98