The Quick Guide to Dark Mode
📣 Sponsor
Dark mode and light mode are becoming more and more prevalent across the web, so it makes sense that standards are now being produced to help us manage this in line with native system settings.
In this guide, we'll be looking at how to do dark mode properly. If you're interested in doing it the lazy way, check out our "Just for fun" article on that below:
Why should we use dark mode?
Dark mode is very trendy and cool at the minute, but the day to day use of it and why you should do it can be boiled down to three main points:
- Accessibility and Usability - Dark mode can provide a method to give higher contrast to users with sight issues. It also lets users who want to use dark mode on their devices continue their journey on your site, rather than being forced to view a white page.
- Energy saving - it saves energy, especially on devices where pure black pixels do not emit any light.
- Options - it gives users options as to how they will view and engage with your pages.
How it works
The media query for dark/light mode switching is prefers-color-scheme. It has 3 potential values:
- light: for light color schemes.
- dark: for (you guessed it) dark color schemes.
The browser will read from the system whether the user has turned on dark or light mode to determine which color scheme to use.
In code, then, we can style dark mode as such:
body {
    /* Default background is white */
    background: white;
}
/* Our dark mode: */
@media (prefers-color-scheme: dark) {
    body {
        background: black;
    }
}
Drawbacks
It's often a desired feature that the color scheme is not based off the system's dark or light setting, but via a button. Many websites now feature a button which allows you to turn light or dark mode on.
You might be asking then, how can I do this if I decide to use a media query? Unfortunately, the working group has not come up with an easy way to do this that doesn't require duplicating your CSS. This requires a workaround - this easiest of which is to instead us a class on your body tag which is changed via javascript:
let myDarkModeButton = document.getElementById('color-mode');
myDarkModeButton.addEventListener('click', function(e) {
    if(document.body.getAttribute('data-mode') == "dark") {
        document.body.setAttribute('data-mode', 'light');
    } else {
        document.body.setAttribute('data-mode', 'dark');
    }
});
body[data-mode="dark"] {
    /* Dark Mode Code */
}
body[data-mode="light"] {
    /* Light Mode Code */
}
Javascript Querying
Often users are using their computer when it switches to dark mode. In these cases, your website may not automatically update everything as you want it to be updated. As such, you can hook onto the media query event using a piece of code like this:
let queryDarkMode = window.matchMedia('(prefers-color-scheme: dark)');
queryDarkMode.addListener(function(e) {
    // Dark mode is not activated
});
Adjusting images
Websites don't just have CSS on them. Often images need "turned down" for a dark mode implementation. The easiest way to do this is with CSS filters, but if you are really keen you can try using the picture tag:
<picture>
    <source srcset="dark.png" media="(prefers-color-scheme: dark)">
    <source srcset="light.png" media="(prefers-color-scheme: light)">
    <img src="light.png">
</picture>
Filters
You can turn down the brightness of an image pretty easily like this, to make things a little easier on the eyes when you switch the dark mode:
.image img {
    filter:  brightness(0.5);
}
You can do some other cool things with filters, but realistically setting the brightness is going to do the most for making your images dark mode compatible.
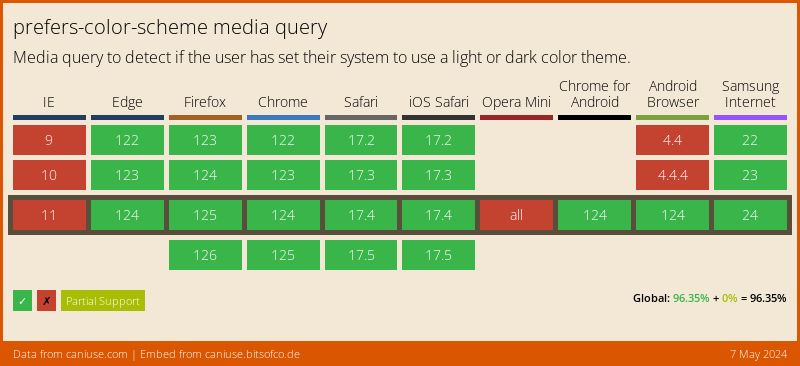
Support for Media Queries
More Tips and Tricks for CSS
- CSS Introduction
- CSS Pseudo Elements
- Creating 3D CSS Buttons which Move as you Mouse Over
- What are Variable Fonts in CSS, and How to Use Them
- CSS Only Masonry Layouts with Grid
- Making 3D CSS Flippable Cards
- How to disable text selection in CSS
- How to Create Animated Cards with WebGL and Three.js
- Creating Custom, Interactive CSS Checkboxes
- The Interactive Guide to CSS Grid
