A Complete Guide to How the CSS not Selector Works
📣 Sponsor
In CSS, it’s often necessary to sign post that we want to select an element, but not in specific circumstances - like if it has a certain class. In these instances, we can use the :not() selector to do that. Let’s look at how it works.
CSS not Selector
The CSS :not() selector is broadly supported by most browsers. The way it works, is that we create a selector, and then specify what it should not be. For example, say you have the following HTML:
<div class="not-red">Not Red</div>
<div class="not-red">Not Red</div>
<div>Red</div>
<div>Red</div>
We have a bunch of divs here, and some shouldn’t be red. If we want all divs in general on our page to be red, except for .not-red elements, we can use :not(.not-red) to ensure they remain, well, not red:
div:not(.not-red) {
    color: red;
}
Here’s another example. By default, all elements will have the Arial font - except for .old-fashioned elements:
<div class="old-fashioned">Old Fashioned Text</div>
<div>Some Text</div>
Our CSS, where only non .old-fashioned elements use the Arial font, looks like this:
div:not(.old-fashioned) {
    font-family: Arial, sans-serif;
}
CSS not Selectors Increase Specificity
You might be familiar with the concept of specificity in CSS, where certain selectors “override” others. For example, a class has a lower specificity than an id, so any id CSS properties will override class properties on the same element.
The :not selector also affects specificity. For example, if you had div:not(#id) in your code, it still counts as having an id, so the specificity increases as if it has an id. This is useful to remember when using :not()
CSS not Selectors and the DOM structure
One confusing thing about :not(), is when you try to use it to stop styles applying to things within elements. For example, suppose you have the following HTML:
<div class="container">
    <form>
        <div class="input-element">
            <input type="text" />
        </div>
    </form>
    <div class="input-element">
        <input type="text" />
    </div>
</div>
Let’s say you want to apply a style to only input elements which are not within form elements. Simple, right? You might try something like this:
div :not(form) input {
    border: 2px solid red;
}
Only this won’t work, and the reason why is that :not() is applied at every level - and we are wrapping each input in .input-element. That means that :not(form) is applied to .input-element, and it is indeed, not a form. So both input elements will have a red border. To avoid that, you need to remove the wrapper element and have the input be a direct child of the form:
<div class="container">
    <form>
        <input type="text" />
    </form>
    <input type="text" />
</div>
That way the input in the form, will not inherit the styles from div :not(form) input.
CSS not Selector Support
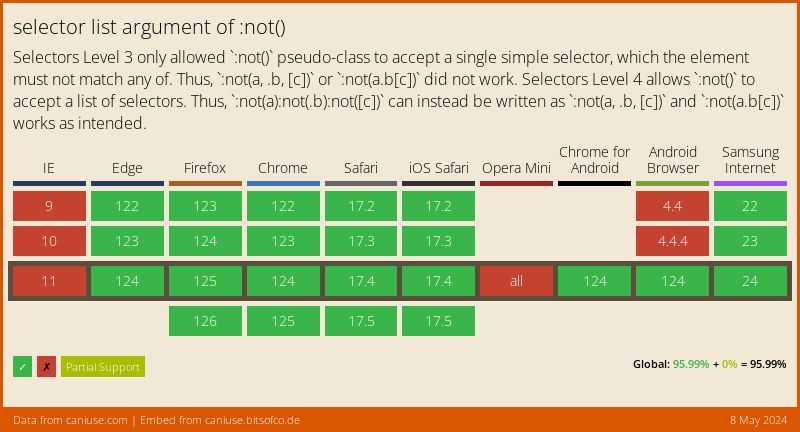
It is important to note that there are two versions of the :not() selector - one which accepts only a single, simple CSS selector, and the newer update to :not() which accepts any CSS selector.
All browsers support single, simple :not() selectors, like the ones we’ve used so far, including Internet Explorer. However, not all browsers support complex selectors. With simple selectors in :not, you can do all of the following:
:not(#id):not(.class):not(element):not([attrbute])
However, things like the following are only available with complex selectors:
:not(#id, .class, [attribute]):not(#id.class):not(element#id, #id.class)
Fortunately, support for complex selectors is still quite high. The only browser not supporting complex selectors today, is Internet Explorer and some mobile browsers:
More Tips and Tricks for CSS
- CSS Layers Tutorial: Real CSS Encapsulation
- CSS Animations
- Parent Selection in CSS: how the CSS has selector works
- What are Variable Fonts in CSS, and How to Use Them
- CSS Pseudo Elements
- How the CSS Box Model Works
- Creating a Javascript Drawing and Annotation Application
- CSS Individual Transform Properties
- Smooth CSS Gradient Transitions
- How to Animate SVG paths with CSS